Summary
To size a rain garden, calculate 20-30% of the area that drains into it. Adjust its depth (3-8 inches) based on soil type and local rainfall. Proper sizing helps manage runoff, reduce erosion, and create an eco-friendly garden.
A rain garden can do much more than make a yard look attractive. It can help manage stormwater, reduce puddles, protect the soil, and support healthy plants and pollinators. But for a rain garden to work well, one thing matters more than most homeowners first expect: the size.
If a rain garden is too small, it may overflow too quickly and fail to catch enough runoff. If it is too large, it can take up more yard space than needed and cost more to build. That is why learning how to size a rain garden for your yard is one of the most important steps in the whole planning process.
In this Blog post we will explain the process in plain, friendly language. It covers what a rain garden is, how runoff works, what factors affect size, how to calculate the right dimensions, and what mistakes to avoid. It also shows where a homeowner can use a Rain Garden Calculator to make the process easier and faster.
What Is a Rain Garden?
A rain garden is a shallow planted area designed to collect and absorb rainwater runoff from hard surfaces such as:
- Roofs
- Driveways
- Patios
- Walkways
- Compacted lawn areas
Instead of allowing water to rush into storm drains or pool in unwanted places, a rain garden slows it down and lets it soak into the soil naturally.
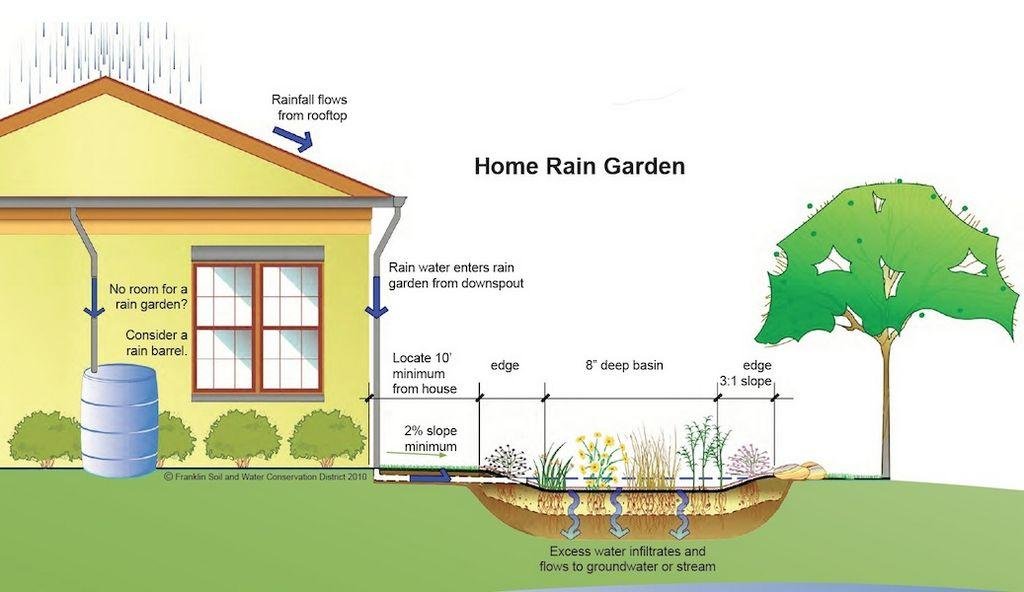
A well-designed rain garden is usually planted with deep-rooted flowers, grasses, shrubs, or native plants that can handle both wet and dry conditions. During a rainstorm, the garden fills with water for a short time. Then the water gradually drains away into the soil, often within 24 to 48 hours.
This makes a rain garden different from a pond. A rain garden is not meant to stay full of water. It is meant to temporarily hold runoff and then let it infiltrate.
Why Rain Garden Size Matters So Much
Many homeowners focus first on the plants or the shape of the garden. Those things matter, but the real performance of a rain garden starts with proper sizing.
When a rain garden is sized correctly, it can:
- Capture runoff from nearby surfaces
- Reduce erosion in the yard
- Decrease water pooling near the house
- Filter out some pollutants before they reach waterways
- Support healthier soil conditions
- Improve the beauty and function of the landscape
When the size is wrong, problems can appear quickly. A garden that is too small may:
- Overflow during medium or heavy rain
- Stay muddy around the edges
- Fail to manage enough water
- Cause erosion at the inlet or outlet
A garden that is too large may:
- Take up unnecessary space
- Cost more in labor and materials
- Be harder to maintain
- Look out of scale with the yard
That is why it helps to use a practical sizing method or a reliable Calculator Rain Garden instead of guessing.
The Main Goal of Rain Garden Sizing
The main goal is simple: make the rain garden large enough to hold and absorb runoff from a chosen drainage area during a typical rain event.
In most residential projects, the sizing process is based on three major things:
- The drainage area
- The soil type and infiltration rate
- The desired ponding depth
Some designs also consider slope, overflow direction, local rainfall patterns, and space limitations.
These factors work together. A yard with fast-draining sandy soil may need a smaller rain garden than a yard with heavy clay soil, even if both collect the same amount of water. That is because sandy soil can absorb water more quickly.
Step 1: Identify the Drainage Area
The first step in sizing a rain garden is figuring out where the water is coming from.
A rain garden usually receives runoff from one or more of these:
- Roof downspouts
- Driveways
- Sidewalks
- Patios
- Garage roofs
- Sheds
- Sloped lawn sections
This contributing area is called the drainage area or catchment area.
Why the Drainage Area Is Important
The larger the drainage area, the more water will flow into the rain garden during a storm. This means the rain garden must be large enough to handle that runoff.
For example:
- A small shed roof may only require a modest rain garden
- A large house roof plus driveway may require a much larger one
How to Measure the Drainage Area
A homeowner can measure the length and width of each surface that drains into the rain garden.
For a rectangular roof section, driveway, or patio:
Area = length × width
Examples:
- Roof section: 30 feet × 20 feet = 600 square feet
- Driveway: 40 feet × 12 feet = 480 square feet
- Patio: 15 feet × 10 feet = 150 square feet
If more than one surface drains into the future rain garden, they can be added together.
Total drainage area = 600 + 480 + 150 = 1,230 square feet
For odd-shaped areas, it helps to divide them into smaller rectangles or triangles and then total them.
A homeowner who wants a quicker estimate can also use a Rain Garden Calculator to simplify this part of the process.
Step 2: Understand the Soil Type
Soil makes a huge difference in how a rain garden performs. Some soils drain quickly. Others drain slowly and can stay wet for too long.
The three basic soil categories are:
- Sandy soil – drains fast
- Loamy soil – drains at a moderate rate
- Clay soil – drains slowly
Why Soil Type Affects Size
A rain garden built in sandy soil usually does not need to be as large because the water infiltrates faster.
A rain garden built in clay-heavy soil often needs more surface area because the water moves into the ground more slowly.
A Simple Soil Test
One practical way to test drainage is with an infiltration test.
Basic Infiltration Test Steps
- Dig a hole about 6 to 8 inches deep in the proposed rain garden area
- Fill it with water and let it drain once
- Fill it again
- Measure how long the water takes to drain
This gives a rough idea of how quickly the soil absorbs water.
General Drainage Meaning
- Water drains very quickly: soil is likely sandy or well-draining
- Water drains at a moderate pace: soil may be loamy
- Water stays for a long time: soil may be clayey or compacted
If water still sits after 48 hours, that location may not be ideal unless the soil is amended or the design is adjusted carefully.
Step 3: Measure the Yard Slope
Slope also matters when choosing the right size and shape.
A rain garden works best on a gentle slope. If the area is too steep, water may rush through too fast and erode the basin.
Why Slope Affects Design
Slope influences:
- The shape of the garden
- The depth of excavation needed
- The width across the slope
- The stability of the berm or edge
A flatter yard may allow more freedom in shape. A steeper yard often requires a longer, narrower garden placed across the slope to slow water naturally.
Basic Slope Guide
- Flat to gentle slope: usually easiest for rain gardens
- Moderate slope: possible with careful design
- Steep slope: may require professional advice
If the site is challenging, a homeowner can still estimate the basic size using a Rain Garden Calculator and then refine the design based on the grade.
Step 4: Decide the Ponding Depth
Ponding depth means how deep the water is allowed to collect in the rain garden during a storm before it begins to overflow.
In residential rain gardens, the ponding depth is often shallow. This helps with safety, appearance, and plant health.
A common ponding depth may be around:
- 4 inches
- 6 inches
- 8 inches in some cases
Why Ponding Depth Matters
A deeper rain garden can hold more water in a smaller footprint. A shallower one may need more surface area to manage the same runoff volume.
However, going too deep is usually not the best choice for most home landscapes. Shallow basins tend to:
- Blend better into the yard
- Be easier to plant
- Drain more evenly
- Look more natural
That is why many rain garden designs balance moderate area with shallow depth.
Step 5: Estimate How Much Runoff the Garden Needs to Hold
Now the homeowner can begin calculating the amount of water the rain garden needs to manage.
A simple way to think about runoff is this:
Runoff volume depends on the drainage area and the amount of rainfall.
For example, if one inch of rain falls on a roof, that water has to go somewhere. Since a roof is hard and non-absorbent, most of that rain becomes runoff.
Simple Rule of Thumb
A common way to start is to design a rain garden to capture runoff from a typical storm event, often around 1 inch of rainfall.
This is a practical residential approach in many places because small and medium storms happen more often than extreme storms.
Example
If the drainage area is 1,000 square feet and the goal is to capture runoff from 1 inch of rain, the rain garden should be sized to temporarily hold that water and let it soak in.
Because hard surfaces create a lot of runoff, roofs and driveways are major contributors.
Step 6: Use a Simple Rain Garden Sizing Method
There are many technical formulas used by engineers and stormwater professionals, but homeowners often use a simpler residential method.
One common approach is to size the rain garden as a percentage of the drainage area, depending on soil type.
Common Rule-of-Thumb Percentages
These are rough planning estimates:
- Sandy soil: rain garden may be about 10% to 15% of drainage area
- Loamy soil: rain garden may be about 15% to 20% of drainage area
- Clay soil: rain garden may be about 20% to 30% of drainage area
These are not strict laws, but they give a good starting point.
Example 1: Sandy Soil
- Drainage area = 1,000 square feet
- Garden size at 10% = 100 square feet
Possible size:
- 10 feet × 10 feet
- 8 feet × 12.5 feet
Example 2: Loamy Soil
- Drainage area = 1,000 square feet
- Garden size at 15% = 150 square feet
Possible size:
- 10 feet × 15 feet
- 12 feet × 12.5 feet
Example 3: Clay Soil
- Drainage area = 1,000 square feet
- Garden size at 25% = 250 square feet
Possible size:
- 10 feet × 25 feet
- 15 feet × 16.7 feet
This is why soil testing matters. The same roof may require very different rain garden sizes depending on drainage conditions.
For a faster estimate based on area and conditions, many people prefer to use a Rain Garden Calculator.
Step 7: Convert the Size Into a Shape That Fits the Yard
Once the total surface area is known, the next step is turning that number into a workable layout.
A rain garden does not have to be a perfect square or circle. It can be:
- Oval
- Kidney-shaped
- Rectangular
- Crescent-shaped
- Natural curved form
Choosing the Right Shape
The shape often depends on:
- The yard layout
- Distance from the house
- Slope direction
- Existing trees or utilities
- Aesthetic preference
A long rain garden laid across a slope can work very well because it slows water and spreads it out. A rounded garden may fit nicely near a patio or lawn edge.
Example
If the required area is 180 square feet, possible shapes include:
- 12 feet × 15 feet
- 10 feet × 18 feet
- 9 feet × 20 feet
- A curved bed with equal total area
The key is that the surface area matches the target size and the basin is graded properly.
How to Size a Rain Garden From a Roof Downspout
One of the most common home projects is building a rain garden that captures runoff from one or two downspouts.
Example Scenario
A homeowner wants to manage water from a roof section that measures:
- 25 feet long
- 20 feet wide
The drainage area is:
25 × 20 = 500 square feet
Now assume the soil is loamy.
Using a rough planning factor of 15%:
500 × 0.15 = 75 square feet
Possible rain garden sizes:
- 5 feet × 15 feet
- 6 feet × 12.5 feet
- 7.5 feet × 10 feet
This would be a reasonable starting size.
If the soil is clay-heavy, the same roof section may need closer to:
500 × 0.20 or 0.25 = 100 to 125 square feet
This example shows why two homes with similar roofs can need different rain garden sizes.
How to Size a Rain Garden for a Driveway
Driveways can send a lot of runoff during storms because they are compact and hard.
Example Scenario
A driveway measures:
- 40 feet long
- 10 feet wide
Drainage area:
40 × 10 = 400 square feet
If the soil is sandy and the homeowner uses a 10% estimate:
400 × 0.10 = 40 square feet
Possible rain garden sizes:
- 5 feet × 8 feet
- 4 feet × 10 feet
If the soil is clay-heavy and the homeowner uses 25%:
400 × 0.25 = 100 square feet
Possible sizes:
- 10 feet × 10 feet
- 8 feet × 12.5 feet
The difference is significant.
How to Size a Rain Garden for Mixed Runoff Sources
Sometimes a rain garden collects runoff from more than one source, such as:
- Part of the roof
- A driveway edge
- A patio or walkway
Example
- Roof area draining to garden = 600 square feet
- Driveway area draining to garden = 300 square feet
- Patio area draining to garden = 100 square feet
Total drainage area:
600 + 300 + 100 = 1,000 square feet
If the soil is loam and the planning target is 15%:
1,000 × 0.15 = 150 square feet
Possible sizes:
- 10 feet × 15 feet
- 12 feet × 12.5 feet
- 8 feet × 18.75 feet
A Rain Garden Calculator is especially useful when several surfaces drain into one basin.
Important Site Placement Rules Before Finalizing Size
Sizing is important, but placement matters just as much. A homeowner should never size a rain garden without also checking whether the site is suitable.
Good Placement Basics
A rain garden is often best placed:
- At least several feet away from the house foundation
- In an area where runoff flows naturally
- Away from septic systems
- Away from major tree roots when possible
- In a place where overflow can move safely away
Avoid These Areas
A rain garden should not be placed:
- Right against a building foundation
- Over buried utility lines without checking first
- In a spot that stays wet all the time
- Where standing water already lasts for days
- In a very steep slope without proper design
If the first location chosen is not suitable, the target area may have to be reshaped or moved, even if the math seems correct.
The Role of Overflow in Rain Garden Sizing
No rain garden should be designed as if it will hold every drop of every storm. Very large storms will produce more runoff than most residential rain gardens are built to manage.
That is why every rain garden should have a safe overflow path.
Why Overflow Matters
Even a correctly sized rain garden can fill up during heavy rain. If there is no overflow plan, water may:
- Wash out the garden edge
- Flow toward the house
- Erode mulch and plants
- Damage nearby lawn areas
A Good Overflow Plan
A simple overflow route may direct extra water toward:
- A lawn swale
- A lower landscape bed
- A safe drainage path away from buildings
This means a homeowner can size the rain garden for common storms while still protecting the yard during bigger events.
How Soil Infiltration Can Change the Final Size
Two rain gardens with the same drainage area and same ponding depth can still perform differently because infiltration rate changes the speed of drainage.
Faster Infiltration
If water moves into the soil quickly:
- The garden empties sooner
- It is ready for the next storm faster
- The surface area may be smaller
Slower Infiltration
If water drains slowly:
- The garden stays wet longer
- It may need more width or length
- It may need soil improvement
- The plant selection becomes more important
Some homeowners improve the soil with compost or use a prepared soil mix, but this should be done carefully. A rain garden should still function as a stable basin, not a loose pit that settles badly.
A Practical Sizing Example From Start to Finish
To understand the process better, it helps to walk through a full example.
Example Yard
A homeowner wants to build a rain garden to catch runoff from one part of the roof and a side driveway.
Step 1: Measure the drainage area
- Roof section = 30 feet × 20 feet = 600 square feet
- Driveway section = 25 feet × 10 feet = 250 square feet
Total drainage area = 850 square feet
Step 2: Check soil type
A simple infiltration test suggests the soil is loamy.
Step 3: Pick a planning percentage
For loam, a practical planning range may be 15% to 20%.
Using 18%:
850 × 0.18 = 153 square feet
Step 4: Choose a shape
Possible shapes include:
- 9 feet × 17 feet = 153 square feet
- 10 feet × 15.3 feet = 153 square feet
- 12 feet × 12.75 feet = 153 square feet
Step 5: Confirm yard fit
The chosen space near the side yard allows a basin around 10 feet × 16 feet, so that works well.
Step 6: Plan for overflow
An overflow notch is set so extra water moves safely toward a lawn area away from the house.
That is a realistic residential sizing process.
A person who wants to avoid doing the calculations by hand can estimate much of this with a Rain Garden Calculator.
Common Mistakes People Make When Sizing a Rain Garden
Even a beautiful rain garden can fail if early planning mistakes are made. These are some of the most common sizing issues.
1. Guessing Instead of Measuring
Many homeowners look at the yard and estimate by eye. This often leads to under-sizing.
A roof section that seems small may actually contribute hundreds of square feet of runoff.
2. Ignoring Soil Drainage
Soil is one of the biggest sizing factors. Skipping the infiltration test can create problems later.
3. Making the Garden Too Deep Instead of Wide Enough
Some people try to save space by digging deeper. But very deep basins are not always the best choice for home landscapes.
4. Forgetting the Overflow Path
A rain garden is not complete without a safe place for extra water to go.
5. Placing It Too Close to the House
Water should be managed responsibly, not concentrated near the foundation.
6. Trying to Capture Too Large an Area With One Small Garden
If the drainage area is large, it may be better to build a larger basin or even split runoff into more than one rain garden.
7. Not Using a Sizing Tool
A simple Rain Garden Calculator can help reduce avoidable errors during planning.
Can a Rain Garden Be Too Big?
Yes, it can.
A rain garden that is much larger than needed may still work, but it can create unnecessary cost and maintenance. It may also look oversized in a small yard.
A well-sized rain garden should feel intentional and proportional. It should look like part of the landscape, not like a random excavation.
That is why the best approach is not “bigger is always better.” The best approach is right-sized for the runoff, soil, and space available.
What If the Yard Has Clay Soil?
Clay soil often worries homeowners, but it does not always mean a rain garden is impossible.
It simply means more care is needed.
What Clay Soil Usually Means
- Water drains slowly
- The rain garden may need more surface area
- Ponding should be watched carefully
- Soil improvement may help
- Native plants that tolerate wet periods are important
In some yards, clay soil can still support a good rain garden if the basin is wide enough and the overflow is designed well.
But if the infiltration is extremely poor, a homeowner may need site-specific advice before building.
What If the Yard Is Small?
A small yard can still have a rain garden. The design just needs to match the available space.
Small Yard Strategies
- Capture runoff from only one downspout instead of the whole roof
- Use a long narrow shape along the yard edge
- Build one modest garden now and add another later
- Focus on the highest-problem runoff area first
This is where a compact design and a Rain Garden Calculator can be very useful.
How to Choose the Right Dimensions After Calculating Area
After the size is known in square feet, many homeowners ask the same question: what should the actual dimensions be?
There is no single answer, but a few principles help.
Width and Length Tips
- A longer garden often works well across a slope
- A wider garden may fit better in open lawn space
- Curved edges often look more natural than sharp corners
- Dimensions should allow easy planting and maintenance
Example
If the target area is 120 square feet, all of these could work:
- 8 feet × 15 feet
- 10 feet × 12 feet
- 6 feet × 20 feet
The best option depends on how water enters, how the yard looks, and where overflow can safely go.
Rain Garden Depth and Surface Area: Finding the Balance
Garden sizing is not just about square footage. Depth of the rain garden and area work together.
A shallow garden with more area can often be better than a narrow deep one. That is because broad, shallow basins usually:
- Spread water more evenly
- Support stronger plant establishment
- Look more attractive
- Reduce steep edges
- Improve safety and access
This is why most home rain gardens are designed as broad, gently depressed landscape beds rather than deep pits.
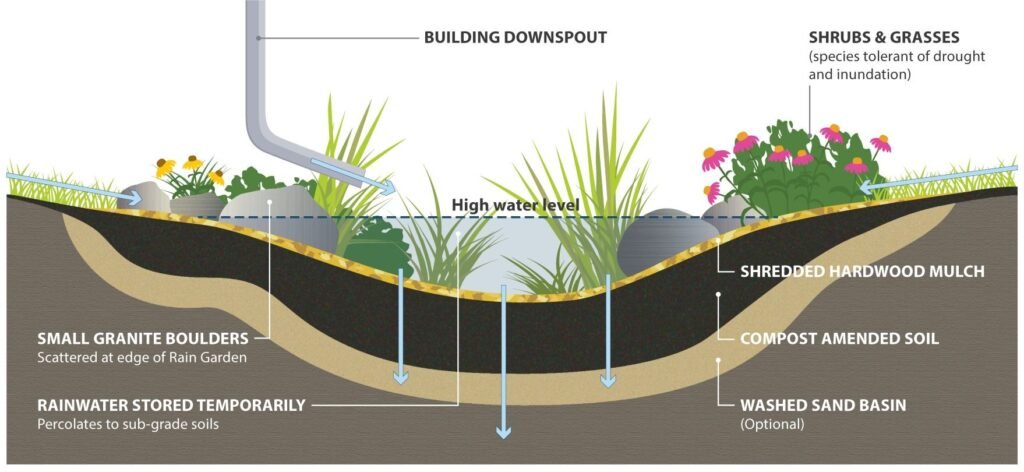
How Mulch and Plants Affect Performance
Plants and mulch do not usually change the math of sizing in the same way drainage area and soil do, but they matter for real-world performance.
Plants Help By:
- Slowing water movement
- Improving soil structure over time
- Supporting infiltration through roots
- Reducing erosion
- Making the garden more attractive
Mulch Helps By:
- Protecting the soil surface
- Reducing crusting
- Limiting erosion from inflow
- Retaining moisture for plants
A properly sized rain garden works even better when it is planted thoughtfully and maintained well.
How to Know If a Rain Garden Is Undersized After Installation
Sometimes a homeowner builds a rain garden and only later realizes that it may be too small.
Signs of an undersized rain garden include:
- Frequent overflow during modest storms
- Water rushing out at one edge
- Soil washing away near the inlet
- Water standing too long after storms
- Plants struggling because the basin stays too wet
What Can Be Done
Possible fixes include:
- Expanding the surface area
- Improving the inlet so water spreads out better
- Adjusting the overflow path
- Diverting some runoff elsewhere
- Building a second rain garden
This is another reason why using a trusted Rain Garden Calculator early in planning can save time later.
How to Know If a Rain Garden Is Oversized
A rain garden that is slightly larger than required is not usually a problem. But if it is much too large, some signs may show up:
- The garden rarely collects enough water to function as intended
- It looks out of place in the yard
- The basin feels empty or underused
- Maintenance area is larger than needed
In most cases, slightly over-sizing is less harmful than under-sizing, but good planning helps avoid both extremes.
Local Climate and Rainfall Considerations
Rainfall patterns vary from place to place. Some regions get frequent light rain. Others get intense downpours with longer dry periods.
This affects how a rain garden behaves over time.
In Wetter Areas
- More frequent storms may fill the basin often
- Good infiltration is especially important
- Overflow planning matters more
In Drier Areas With Intense Storms
- The rain garden may sit dry for long periods
- Plants should tolerate both drought and sudden water
- The basin may need strong inlet protection
A local landscaping guide, extension office, or stormwater resource can help refine the design for regional conditions. But even before that, a homeowner can get a strong first estimate from a Rain Garden Calculator.
When a Homeowner Should Ask for Professional Help
Many residential rain gardens are simple enough for DIY planning and installation. But some situations call for more caution.
Professional advice may be wise when:
- The slope is steep
- The drainage area is very large
- Water flows toward the foundation
- The soil stays saturated for long periods
- Utilities or septic systems are nearby
- The yard has a complicated grading problem
A well-sized rain garden should solve drainage problems, not create new ones.
Easy Formula-Based Thinking for Homeowners
Even without advanced engineering, a homeowner can follow a practical thought process:
- Measure where the runoff comes from
- Test how the soil drains
- Estimate garden area based on soil type
- Choose a shallow ponding depth
- Shape the garden to fit the yard
- Plan a safe overflow path
This step-by-step thinking keeps the project grounded and useful.
Why a Rain Garden Calculator Makes the Job Easier
Manual math is possible, but many homeowners find it easier to use a tool. A good Rain Garden Calculator can help with:
- Estimating drainage area
- Matching size to soil conditions
- Speeding up calculations
- Reducing guesswork
- Comparing different size options
It can also help when a homeowner wants to test several layouts before digging.
For example, one person may want to see whether a 120-square-foot design is enough, while another wants to compare 150 and 180 square feet. Using a simple rain garden sizing calculator or Rain Garden Calculator tool makes this much easier than repeating every step by hand.
Best Practices for a Successful Rain Garden
Once the sizing is correct, a few best practices can make the project much more successful.
Keep the Basin Shallow and Smooth
The garden should have a gentle depression, not sharp holes or steep walls.
Spread Water Evenly
The inlet should slow and distribute runoff so one spot does not erode.
Use Plants That Match Moisture Zones
The center may stay wetter. The edges are often drier. Planting should reflect this.
Protect the Overflow Edge
An overflow notch or stable spillway prevents washout.
Watch the Garden After the First Few Storms
A homeowner can learn a lot by observing:
- How quickly it fills
- How evenly it drains
- Whether water sits too long
- Whether mulch or soil moves
This helps fine-tune the garden if needed.
Simple Rain Garden Sizing Checklist
Before finalizing the design, it helps to review a quick checklist.
Rain Garden Sizing Checklist
- Measured all roof, driveway, patio, or walkway surfaces draining to the garden
- Tested or identified soil drainage conditions
- Considered yard slope
- Chosen a safe location away from the foundation
- Estimated rain garden area based on drainage area and soil
- Planned a shallow ponding depth
- Chosen dimensions that fit the landscape
- Included a safe overflow route
- Selected plants suitable for wet and dry cycles
- Checked calculations with a Rain Garden Calculator
This checklist helps turn a rough idea into a practical project.
Final Thoughts
Sizing a rain garden is the foundation of the whole project. The beauty of the plants, the curve of the bed, and the finishing mulch all matter, but the real function starts with getting the dimensions right.
A well-sized rain garden can protect a yard from runoff problems, improve drainage, support healthy plants, and add lasting beauty to the landscape. It does not need to be complicated, but it does need to be planned carefully.
The most important things to remember are simple:
- Measure the drainage area
- Understand the soil
- Keep the basin shallow
- Match the surface area to the runoff
- Plan for overflow
- Fit the design to the yard
For many homeowners, the easiest way to start is by using a Calculator Rain Garden. A practical Rain Garden Calculator for yard sizing or online Rain Garden Calculator can help remove confusion and make planning more confident.
In the end, the best rain garden is not the biggest one or the prettiest one on paper. It is the one that fits the yard, handles the runoff, drains well, and keeps working season after season.
Frequently Asked Questions
How big should a rain garden be for a house?
It depends on the drainage area, soil type, slope, and ponding depth. In many home projects, the rain garden is often about 10% to 30% of the area draining into it. Sandy soil usually allows a smaller garden, while clay soil often needs a larger one.
Can a rain garden be too small?
Yes. If it is too small, it may overflow often, erode at the inlet, or fail to capture enough runoff. That is why proper measuring and calculation are important.
How deep should a rain garden be?
Many residential rain gardens are fairly shallow, often around 4 to 8 inches of ponding depth. A shallow basin usually works better in a home landscape than a deep pit.
Do rain gardens work in clay soil?
They can, but they often need more surface area and careful planning. If the soil drains very slowly, testing the location before building is important.
What is the easiest way to size a rain garden?
The easiest way is to measure the drainage area, check the soil type, and then use a Rain Garden Calculator to estimate the right size for the yard.