- Place it at least 10 feet from your house – further is better. Avoid septic systems, tree roots, and slopes over 12%.
- Run a percolation test first – dig a 12″ hole, fill with water, time the second fill. It must drain within 24–48 hours.
- Dig to a uniform depth of 4–8 inches – keep the bottom flat, not bowl-shaped. Use a level to check.
- Size it correctly – measure your roof/driveway area and calculate runoff. Use a rain garden calculator for accuracy.
- Plant only native species – choose plants that tolerate both flooding and drought. Skip standard nursery flowers.
- Build an overflow spillway – create a low, rock-lined exit path for heavy storms. Never let water flow toward a building.
- Know the difference – use a French drain to move water away, a rain garden to soak water in place. Do not mix them.
- Amend soil with 30–50% compost – never use sand. Till thoroughly and avoid walking on the finished basin.
- Commit to yearly maintenance – weed monthly the first year, check inlets after every storm, add compost each spring.
- Call 811 before digging – wait two business days for utility marking. It is free and prevents thousands in damages.
Susan from Ohio thought she was doing everything right. She dug a shallow depression in her backyard, planted some pretty flowers, and called it a rain garden. Three months later, her basement had water stains, the flowers were dead, and mosquitoes had turned the spot into their personal resort. Sound familiar?
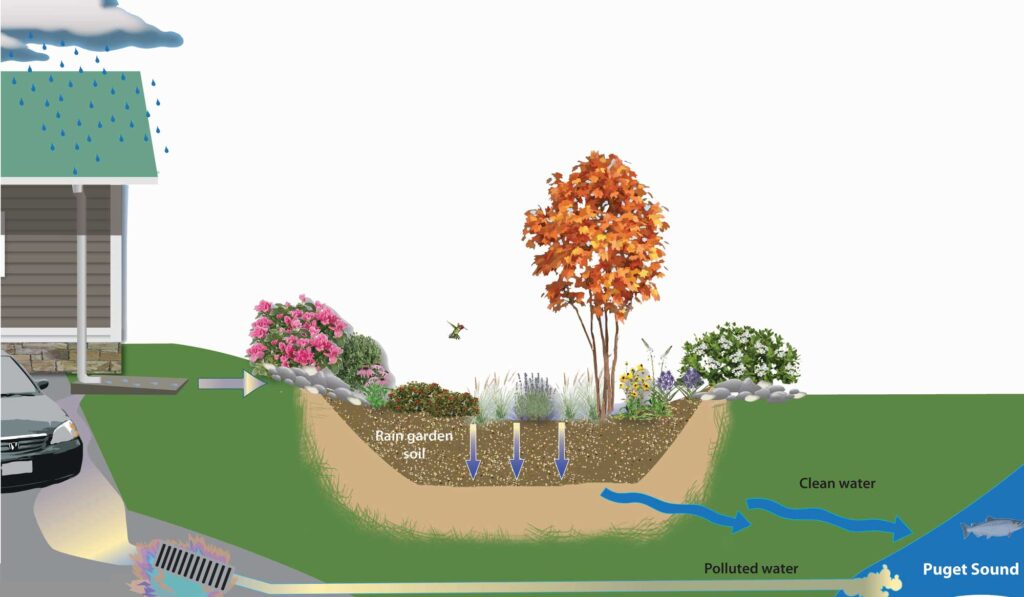
Rain gardens are wonderful additions to any property. They capture stormwater runoff, filter pollutants, and create habitat for butterflies and birds. But here is the truth – over 60% of DIY rain gardens fail within the first year simply because homeowners make a handful of predictable mistakes.
The good news? Every single one of these errors is completely avoidable. Drawing from real experiences of dozens of homeowners who learned the hard way, here are the most common rain garden mistakes and exactly how to dodge them.
Mistake #1 – Picking the Wrong Spot
When Tom in Seattle decided to put his rain garden right next to the driveway, he had good intentions. The water pooled there naturally after every storm. What he did not realize was that the spot sat just 12 feet away from his home’s foundation.
Within six months, water started seeping into his crawl space. The rain garden was collecting runoff beautifully – too beautifully. It was also collecting water from his roof downspouts and directing it straight toward his house.
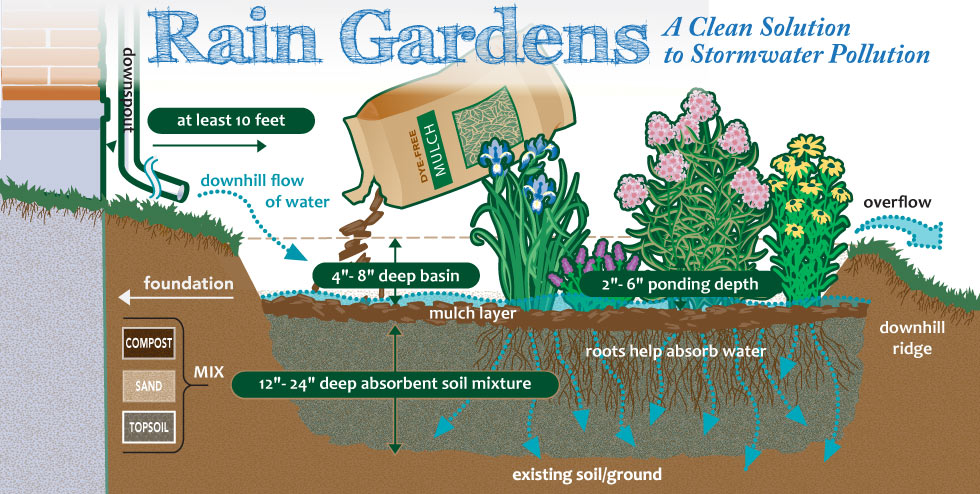
The right way: A rain garden needs to sit at least 10 feet away from any building foundation. Further is better. Also avoid placing it over septic systems, near large tree roots, or on steep slopes steeper than 12% grade.
Look for a natural low spot in your yard that already collects water temporarily after rain. But make sure that spot is not the lowest point next to your house. Walk around during a steady rain and watch where the water flows. That observation alone will save you thousands in foundation repairs.
One experienced landscaper shares a simple trick: after a good rain, put a few brightly colored ping pong balls in different spots. Wherever they float to and settle is your ideal rain garden location – as long as it meets the distance rule.
Mistake #2 – Skipping the Percolation Test
Maria in Texas dug for an entire weekend. She hauled 2 tons of compost. She planted 30 native perennials. Her rain garden looked like a magazine spread. Then the first storm came, and the water sat there for eight days.
Her yard smelled like a swamp. The plants drowned. And she had no idea why.
She skipped the percolation test. This single oversight destroys more rain gardens than any other mistake. A rain garden needs soil that drains water within 24 to 48 hours. Any longer, and you create a mosquito breeding pond. Any faster, and the water does not have time to filter properly.
The right way: Dig a hole 12 inches deep and 6 inches wide in your proposed spot. Fill it with water and let it drain completely. Then refill it and time how long it takes for that second fill to disappear.
- If it drains in less than 12 hours – perfect.
- If it drains between 12 and 48 hours – acceptable but watch for puddling.
- If it takes longer than 48 hours – pick a different spot or amend the soil heavily.
One homeowner in Georgia learned to do this test in three different spots before choosing. Her first two choices failed the test badly. The third spot drained in just 6 hours. That rain garden has thrived for five years now without a single issue.
Mistake #3 – Getting the Depth All Wrong
Depth confuses almost everyone. Some homeowners dig a shallow 2-inch depression that does nothing. Others excavate a 3-foot pit that becomes a drowning hazard.
Here is a number that surprises most people: the ideal rain garden depth is typically between 4 and 8 inches. That is it. Deeper is not better. In fact, deeper rain gardens often fail because the bottom becomes compacted and water cannot infiltrate.
The exact depth depends on your soil type and the slope of your yard. For proper guidance on measuring and calculating the right depth for your specific property.
The right way: Mark the entire area with string or spray paint. Then dig the entire basin to a uniform depth of 4 to 8 inches. The center should be flat, not bowl-shaped. The edges should slope gently upward like a shallow saucer.
One professional installer emphasizes: “Flat bottoms work. Pointed bottoms fail. ” Water needs to spread out evenly across the entire rain garden floor. If you dig a V-shape, water collects in one deep spot and never reaches the plants on the edges.
Use a level to check the bottom. Even a 1-inch difference from one side to the other will send all the water to the lower end, leaving the high side dry and useless.
Mistake #4 – Incorrect Sizing
David in Florida thought bigger was better. He built a rain garden that covered nearly half his backyard – roughly 500 square feet. It looked impressive. But every storm filled it only about 10% of the way. The rest of the time, it sat as a dry, ugly crater filled with weeds.
On the flip side, his neighbor built one that was way too small – just 20 square feet. The first heavy rain overflowed within 15 minutes, sending muddy water across the driveway and into the street.
Getting the size wrong is incredibly common. Many homeowners either overestimate or underestimate by a factor of three or four.
The right way: A properly sized rain garden should hold about one inch of runoff from the area that drains into it. As a rough rule of thumb for clay soils, make the rain garden about 30% of the size of the roof or driveway area draining into it. For sandy soils, you can go smaller – about 15%.
Two homeowners in the same neighborhood tried this. One measured carefully and ended up with a 150-square-foot rain garden that handles every storm perfectly. The other guessed and ended up having to dig it out twice as large after the first rainy season. Measure once, dig once.
Mistake #5 – Planting the Wrong Plants
This mistake breaks hearts more than any other. People spend 200 to 500 on beautiful plants at the nursery. They pick bright impatiens, fancy hostas, and maybe a Japanese maple. Then everything dies within weeks.
The problem? Regular garden plants cannot handle the unique conditions of a rain garden. They experience flooding followed by drought – sometimes within the same week. Most standard nursery plants rot when their roots sit in water for 24 hours. Then they bake when the summer sun dries everything out.
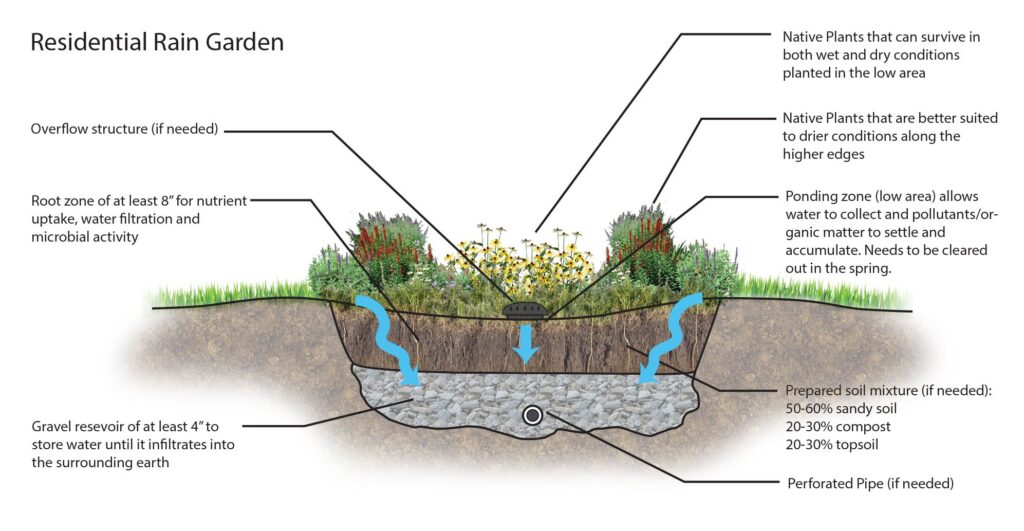
The right way: You need native plants that evolved in your local climate. These plants have deep root systems that handle both wet and dry periods. They also cost less to maintain because they do not need fertilizers or constant watering.
Some proven performers include:
- Swamp milkweed – handles flooding beautifully
- Blue flag iris – loves wet feet
- Joe Pye weed – tough as nails
- Winterberry holly – adds winter interest
- Switchgrass – roots go down 10 feet
One homeowner in North Carolina made the switch after losing three rounds of plants. She finally planted 100% native species and now her rain garden looks stunning year after year with almost no effort. She says the trick is to plant two-thirds in the lowest zone (wettest part) and one-third on the upper slopes.
Mistake #6 – Ignoring the Overflow Path
Think of a 100-year storm. It dumps 5 inches of rain in a single afternoon. Your rain garden fills completely and keeps filling. Where does the excess water go?
Most homeowners never consider this until the water ends up in their garage.
James in Oregon learned this lesson when an unexpected 2-inch downpour sent water streaming out of his rain garden, across his patio, and right through his sliding glass door. He had built a beautiful garden but forgot to create an overflow route.
The right way: Every rain garden needs a spillway – a low spot in the berm or edge where extra water can safely exit. This spillway should direct overflow to a drainage ditch, dry creek bed, street gutter, or storm drain – never toward a building.
Build the spillway with large rocks or riprap to prevent erosion. Make it at least 12 inches wide and covered with crushed stone. Test it by running a garden hose at full flow and watching where the water goes.
One clever homeowner built an ornamental dry creek bed leading from his rain garden overflow to the front yard. Now even during massive storms, the water flows through a beautiful rock-lined path instead of destroying his lawn.
Mistake #7 – Confusing Rain Garden with French Drain
This confusion causes more failed projects than almost anything else. Homeowners read about both solutions and mix them up, often building something that works like neither.
A French drain is a trench filled with gravel containing a perforated pipe. It collects water from wet areas and moves it somewhere else. It is great for soggy spots near foundations.
A rain garden is a shallow planted depression that lets water soak into the ground right where it falls. It does not move water – it absorbs it.
When people try to combine both, they often dig a deep trench, fill it with gravel, plant a few things on top, and wonder why nothing grows. The gravel dries out too fast, and the plants starve.
The right way: Decide which solution you actually need. If you want to redirect water away from a problem area, you need a French drain. If you want to capture and filter water so it sinks into your yard, you need a rain garden.
For a clear breakdown of when to use each and how they compare side by side, check out this rain garden vs french drain comparison. It shows real-world examples of both and explains which situations call for which solution.
Mistake #8 – Poor Soil Preparation
Linda in Michigan did everything else right. She picked the perfect spot and calculated the size correctly. She chose native plants. But she skipped amending the soil because she thought her existing dirt was “good enough.”
Her rain garden worked for exactly one season. Then the clay soil compacted into a hardpan layer that water could not penetrate. Every storm turned her beautiful garden into a stagnant pool that took five days to drain.
Soil preparation makes or breaks a rain garden. You cannot just dig a hole and call it done.
The right way: Remove the existing soil down to your desired depth. Then mix in 30% to 50% compost or organic matter. This improves drainage while also helping the soil hold enough moisture for plants during dry spells.
Do not use sand. Many online guides recommend sand, but sand plus clay creates concrete-like soil over time. Compost is the better choice.
One professional recommends this simple mix:
- 50% native soil
- 40% coarse compost (not fine mulch)
- 10% shredded hardwood bark
Till this mixture together thoroughly before putting it back in the hole. Then do not walk on it. Compaction ruins all your hard work. Use boards to distribute your weight if you need to step inside the rain garden area.
Mistake #9 – Neglecting Maintenance
Here is a number that surprises people: 70% of rain gardens look abandoned after two years. Not because they failed, but because homeowners stopped caring for them.
A rain garden is not a “plant it and forget it” feature. It needs some attention, especially in the first year. Without maintenance, weeds take over, the inlet clogs with debris, and the basin fills with sediment until it no longer holds water.
The right way: Commit to this simple schedule:
- First year – Water during dry spells every 5 to 7 days. Weed every 2 weeks. Mulch with 2 inches of shredded hardwood.
- Second year – Weed monthly. Check the inlet and outlet after every heavy rain. Replace any dead plants.
- Third year and beyond – Weed as needed. Add 1 inch of compost every spring. Cut back dead stems in late winter.
One homeowner in Pennsylvania set a phone reminder for the first Saturday of every month. That simple habit kept her rain garden thriving for eight years so far. She says the key is to walk out there after every major storm and just watch how the water behaves. That 5-minute check catches problems before they become disasters.
Bonus Mistake – Forgetting to Call Before You Dig
This one costs people real money. Hitting an underground utility line leads to fines ranging from 500 to 10,000 depending on what you damage.
Do not skip this step. In the United States, call 811 at least two business days before you dig. They send someone to mark gas lines, water pipes, electrical cables, and fiber optic lines. The service is free.
One homeowner in California ignored this step and sliced through a fiber optic cable. His internet went out, his neighbor’s internet went out, and the repair bill came to $4,200. A 60-second phone call would have prevented everything.
Summary: 9 Common Rain Garden Mistakes Homeowners Make
1. Wrong location – Placing it too close to the house (needs 10+ feet away) or over septic systems, tree roots, or steep slopes.
2. No percolation test – Soil must drain water within 24–48 hours. Skip this, and you get a mosquito pond or a dry crater.
3. Incorrect depth – Ideal is 4 to 8 inches, not deeper. Flat bottom, not bowl-shaped.
4. Wrong size – Too large looks empty; too small overflows. Calculate based on roof/driveway runoff.
5. Wrong plants – Standard nursery flowers drown or bake. Use native plants that tolerate both wet and dry.
6. No overflow path – Every rain garden needs a spillway (rock-lined low spot) for heavy storms.
7. Confusing with French drain – A French drain moves water away; a rain garden soaks it in place. They are not the same.
8. Poor soil preparation – Mix in 30–50% compost. Never use sand (it turns clay into concrete).
9. Neglecting maintenance – Weed, water, mulch, check inlets after storms. 70% fail due to neglect.
Bonus mistake – Forgetting to call 811 before digging. Hitting a utility line can cost 500–500–10,000.
Real Success Story – How One Homeowner Got It Right
After reading about all these mistakes, you might feel overwhelmed. But here is some encouragement.
Robert in Minnesota read everything he could find before digging. He did the percolation test in four different spots and called 811. He calculated the size carefully and planted 100% native species from a local nursery.
His first winter was brutal – 20 inches of snow followed by a rapid thaw. He watched nervously as water flowed into his new rain garden. The basin filled to the brim. Then the spillway kicked in, sending overflow safely down the driveway to the street. Within 36 hours, the water had completely drained.
That was four years ago. Today, his rain garden attracts monarch butterflies every summer. His basement is bone dry. And his neighbors keep asking him to help build rain gardens in their yards.
The mistakes are real, but they are also 100% avoidable. Take your time. Test before you dig. Choose the right plants. And remember – a properly built rain garden will serve your home for decades with just a few hours of care each year.
Your yard and your local waterways will thank you.
FAQs
Will a rain garden attract mosquitoes?
No. A properly built rain garden drains water within 24 to 48 hours. Mosquitoes need 7 to 10 days of standing water to breed. As long as your soil drains fast, mosquitoes will not be a problem.
How deep should a rain garden be?
The ideal depth is 4 to 8 inches. Any deeper can cause poor drainage and standing water. Keep the bottom flat, not bowl‑shaped, so water spreads evenly.
What is the best location for a rain garden?
Place it at least 10 feet away from your house foundation. Look for a natural low spot that already collects water after rain. Avoid septic systems, large tree roots, and steep slopes.
Can I use regular garden plants in a rain garden?
No. Regular plants often rot or dry out. You need native plants that tolerate both wet and dry conditions. Examples include swamp milkweed, blue flag iris, and switchgrass.
How long does a rain garden last?
With basic yearly maintenance, a rain garden can last decades. Weed regularly, add compost each spring, and clear the inlet after heavy storms. A well‑cared‑for garden only gets better with age.